Check PDF Bleed Box: Confirm Extra Edge Area Before You Print, Trim, or Send to Press
To check PDF bleed box settings, compare the bleed box with the trim box so you can confirm whether the PDF includes extra artwork beyond the final cut line.
If the bleed box is missing, too tight, or uneven, fix it before you print, trim, or send the file to a press so backgrounds, photos, and borders do not leave thin white slivers at the edges.
That is the practical answer most people need. A lot of PDFs look perfectly fine on screen because viewers show the page neatly, but commercial trimming is less forgiving. If the artwork stops exactly at the finished page edge, even a tiny cut shift can expose paper at the borders. Checking the bleed box helps you catch that problem before a print run, brochure batch, booklet, flyer, or card job becomes expensive rework.
Fastest practical path: compare the bleed box with the trim box, confirm whether the design really extends past the final cut line, then fix the source file or crop cleanup based on what you actually find.
In a hurry? Jump to the 2-minute bleed-box check.
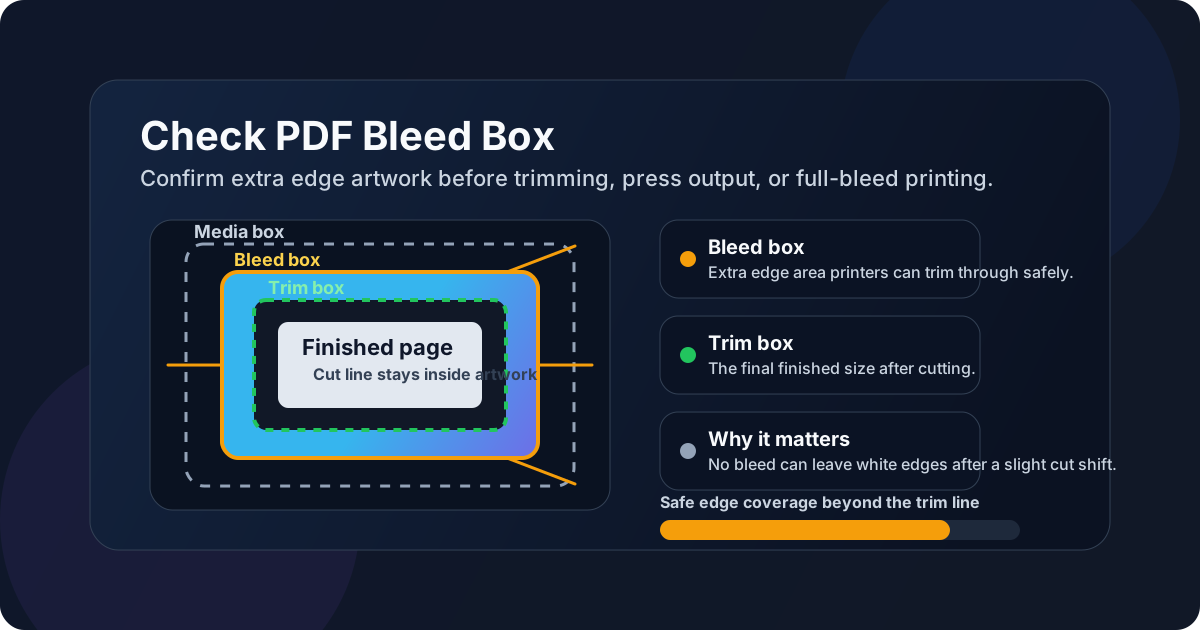
Table of contents
- Quick start: check a PDF bleed box in 2 minutes
- What a PDF bleed box actually means
- Bleed box vs trim box, crop box, and media box
- When bleed-box problems actually matter
- How to check the bleed box on a real PDF
- What to do if the bleed box is missing or wrong
- Related LifetimePDF tools and guides
- FAQ (People Also Ask)
Quick start: check a PDF bleed box in 2 minutes
If you only need the shortest route from uncertainty to a confident answer, use this order:
- Open the exact PDF you plan to print or send to a print shop.
- Check the page properties and compare the bleed box with the trim box.
- Confirm that any background color, photo, or border meant to reach the edge also extends beyond the trim line.
- Review the crop box and media box if the visible page or outer area looks suspicious.
- If the artwork stops at the trim edge, rebuild or re-export with real bleed instead of assuming a crop will save it.
What a PDF bleed box actually means
A bleed box defines the outer area intended to include extra printable content beyond the final cut size. Think of it as the safety cushion around the trimmed page. When a brochure, flyer, business card, poster, label, or booklet is cut down to its finished dimensions, the printer trims through that extra edge area instead of trimming exactly at the end of the visible design.
That extra area matters because trimming is never infinitely perfect. Even good production workflows allow tiny shifts. Without bleed, a small shift can reveal unprinted paper at the border. With bleed, the cut still lands inside matching color or artwork, so the finished piece looks intentional.
Bleed is important when
backgrounds, photos, tints, patterns, or borders are supposed to run all the way to the edge after trimming.
Bleed is less important when
the document already keeps a comfortable white margin, like contracts, forms, reports, and many office PDFs.
Bleed does not fix
wrong page size, low image resolution, or missing artwork. It only gives the cutter safe extra edge coverage.
The reason this topic gets confusing is that the bleed box is only one part of the PDF page-box system. If you only look at the visible preview, you can miss how the file is actually defined underneath. That is why checking the surrounding boxes matters too.
Bleed box vs trim box, crop box, and media box
These page boxes describe different things, and mixing them up is how people end up fixing the wrong problem.
| PDF box | What it represents | Why it matters here |
|---|---|---|
| Bleed box | The outer area meant to carry extra edge artwork beyond the final cut | This is what helps edge-to-edge designs survive trimming without white slivers |
| Trim box | The intended finished size after the sheet is cut | This is the reference line you compare against when checking whether enough bleed exists |
| Crop box | The area many viewers treat as the visible page region | A neat preview can hide production problems if the crop box distracts you from the trim and bleed relationship |
| Media box | The full stored page canvas in the PDF | Useful for understanding the total document space, especially when marks, extra margins, or odd exports are involved |
The most important comparison is still simple: does the artwork extend beyond the trim box into the bleed area? If the answer is no, the bleed box will not protect you no matter how tidy the file looks in a viewer.
When bleed-box problems actually matter
Not every PDF needs bleed, so it helps to know when this is a real issue and when it is just technical trivia.
High-risk jobs
- Flyers with colored backgrounds
- Booklets with photos touching the edge
- Business cards and postcards
- Posters, menus, packaging, labels, and inserts
- Any PDF headed to commercial trimming or press
Lower-risk jobs
- Screen-only PDFs
- Forms and contracts with built-in margins
- Reports printed on office printers with white borders
- Documents where no design element is meant to hit the edge
- Internal drafts where final trimming is not part of the workflow
A useful mental shortcut is this: if a human being or machine will cut the printed sheet down to its final size, checking bleed is worth the minute it takes. If the document is just being emailed, archived, or printed with normal margins on an office device, bleed may not matter at all.
How to check the bleed box on a real PDF
The best bleed-box check is practical, not theoretical. You want to know whether the exact outgoing PDF is safe for the actual job.
1) Open the real outgoing file
Do not inspect an old export, an email preview, or a draft from yesterday if a different file is actually going to the printer. Use the exact PDF that will be uploaded, shared, or printed. Small export changes can alter page boxes without you noticing.
2) Check the page properties
Start with View PDF Properties and look at the defined page areas. You are mainly looking for how the bleed box relates to the trim box, but the crop and media boxes help explain strange outer space, crop marks, or oversized canvases.
3) Confirm edge artwork really extends beyond trim
This is the point people skip. A file can technically list a bleed box, but if the artwork itself stops at the trim edge, the bleed is not doing useful work. Look at any background panel, photo, color block, or border that is supposed to print to the edge and make sure it continues into the bleed area.
4) Check all edges, not just one
Top, bottom, left, and right should make sense together. Uneven bleed is still a real problem. One clean side does not save a page where another side ends right at trim.
5) Compare the result to the real output method
A home printer, a digital press, and a commercial print shop do not all treat files the same way. If the job is being cut after printing, be conservative. If it is just a digital proof, the urgency is lower. The page boxes need to match the production path, not just your screen.
What to do if the bleed box is missing or wrong
Once you know the bleed status, the right fix becomes much easier to choose.
If the bleed box exists and the artwork extends properly
Good. Your next job is mostly validation. Recheck the trim box, confirm the final page size, and remove distracting marks only if your printer or workflow does not want them.
If the bleed box is missing
Cropping the PDF will not create real bleed. If the design needs to run to the edge, the better fix is usually to return to the layout source and export a new PDF with proper bleed included. This is especially true for brochures, cards, packaging, posters, and branded marketing pieces.
If the page has too much junk outside the final area
Sometimes the opposite problem appears: crop marks, oversized canvas space, or accidental outer clutter makes the PDF look messy. In that case, compare the bleed, trim, and crop definitions first, then use Crop PDF or the cleanup guide for removing crop marks from a PDF if that is truly the right fix.
If the file only needs office printing
You may not need to fix bleed at all. For internal handouts, contracts, or basic reports printed with white margins, the absence of bleed is often irrelevant. The goal is not to chase technical perfection where it does not help the real document.
Good decision sequence: confirm whether the job truly needs edge-to-edge output, compare bleed against trim, verify the artwork extends past trim, then either re-export with real bleed or clean up the existing PDF only if the problem is cosmetic.
Related LifetimePDF tools and guides
View PDF Properties
Start here when you need to inspect the page definitions before changing anything.
Open the guideCheck PDF Trim Box
The closest companion when you need to confirm the true finished cut size.
Read the trim-box guideCheck PDF Crop Box
Helpful when the visible page area and the production area seem to disagree.
Read the crop-box guideCheck PDF Page Size
Use this when the bleed question is really hiding a size mismatch.
Check the page sizeCrop PDF
Useful for cleanup when outer clutter is the problem, not missing bleed artwork.
Open Crop PDFRemove Crop Marks from PDF
Read this when the file includes visible production marks you do not want in the final output.
Read the cleanup guideFAQ (People Also Ask)
How do I check a PDF bleed box?
Compare the bleed box with the trim box first, then review the crop and media boxes if the file still looks odd. For full-bleed work, the artwork should continue beyond the trim line into the bleed area.
What is the difference between a bleed box and a trim box in a PDF?
The trim box is the intended finished page after cutting. The bleed box sits outside that final edge and provides extra artwork that printers can trim through safely.
Do all PDFs need a bleed box?
No. Screen-only files, forms, contracts, and many office documents do not need bleed. It matters mostly when a design is supposed to print all the way to the edge after trimming.
Can I fix missing bleed by cropping the PDF?
Usually no. Cropping can hide marks or extra space, but it cannot create missing edge artwork. If the design must run to the edge, re-exporting or rebuilding the source file with proper bleed is the better fix.
Why does the PDF look fine on screen but still fail at the print shop?
Viewers can make a PDF look clean even when the underlying production setup is wrong. A file may still have no usable bleed, uneven bleed, wrong trim dimensions, or marks that only become obvious when the job is imposed or trimmed.
Ready to check the file properly?
Best default workflow: open the real outgoing PDF → compare bleed to trim → confirm edge artwork really extends past the cut line → re-export with true bleed if it does not → only crop or clean up when the problem is outside clutter, not missing artwork
Published by LifetimePDF — Pay once. Use forever.