Check PDF Trim Box: Confirm the Finished Page Edge Before You Print, Trim, or Share
To check PDF trim box settings, inspect the page boxes and confirm where the finished page edge is meant to fall before you print, trim, upload, or share the file.
If the trim box does not match the real finished page, fix it before visible crop marks, clipped edge content, or awkward borders turn a good PDF into a confusing one.
This matters because many PDFs look almost right. A file can have solid artwork, readable text, and even the right paper size while still feeling off because nobody confirmed where the final page is actually supposed to end. That is when people print with marks still showing, trim too aggressively, or send a client-facing PDF that still behaves like a production proof. A quick trim-box check separates finished-document intent from everything that only exists to help the file get produced.
Fastest practical path: compare the trim box against the crop box, media box, and any bleed area, then decide whether the PDF needs cleanup, a new export, or no change at all.
In a hurry? Jump to quick start: check a PDF trim box in about 5 minutes.
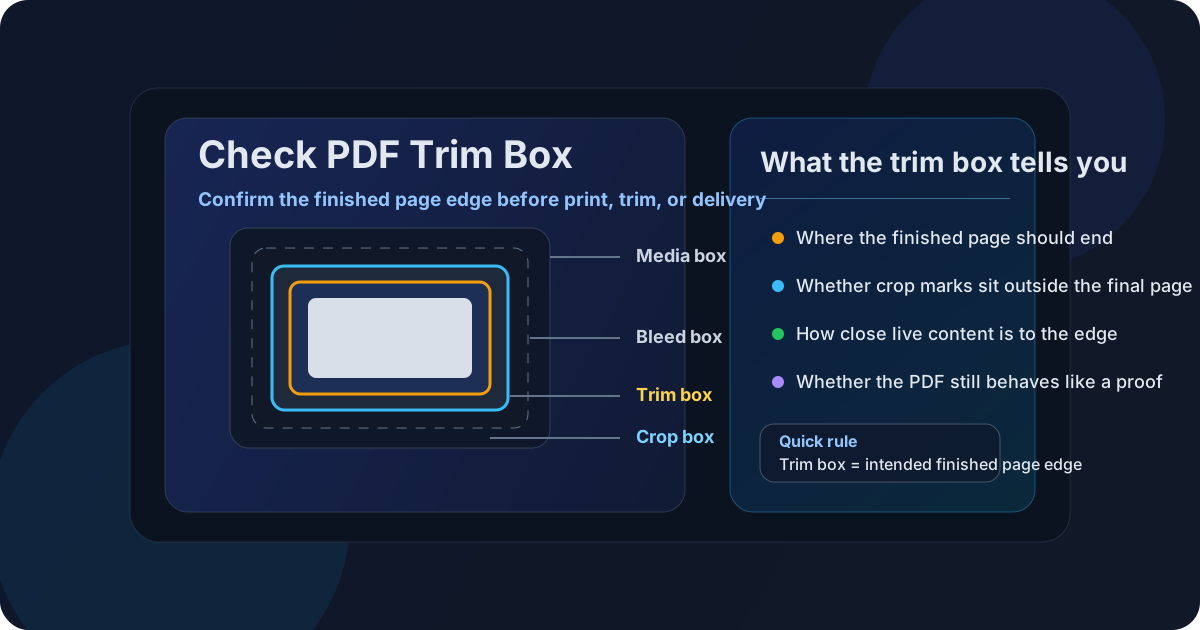
Table of contents
- Quick start: check a PDF trim box in about 5 minutes
- What a PDF trim box actually means
- Trim box vs crop box, bleed box, and media box
- Why checking the trim box matters
- Step-by-step: practical trim-box review workflow
- Common trim-box mistakes and what they usually mean
- When to crop, re-export, or leave the PDF alone
- Related LifetimePDF tools and guides
- FAQ
Quick start: check a PDF trim box in about 5 minutes
If your goal is simply confirm the finished page edge before this PDF causes trouble, this is the shortest useful workflow:
- Open the exact PDF you plan to print, trim, upload, or share.
- Review the page boxes and identify the trim box, the visible page area, and any bleed or outer production space.
- Check whether page numbers, footers, signatures, or artwork sit uncomfortably close to the trim edge.
- Confirm whether the PDF is meant for print production or normal reader-facing use.
- If the visible outer area is the problem, use Crop PDF. If the file was exported with the wrong page definition, re-exporting may be the cleaner fix.
- Preview the result once before you trust it.
What a PDF trim box actually means
The trim box defines the intended final page size after trimming. In practical terms, it tells you where the finished document should end once production extras are no longer part of the job. That makes it especially important in PDFs that came from design tools, commercial print workflows, scans with production clutter, or mixed-source documents where the page edges are not obvious at a glance.
A trim box check is useful when you are dealing with:
- brochures, flyers, packaging proofs, or book pages exported for print,
- PDFs that still show crop marks or outer bleed,
- files that feel too loose or too tight around the content,
- documents that print fine on one device but look unfinished elsewhere,
- client-facing PDFs that still behave like prepress files.
Trim box vs crop box, bleed box, and media box
The trim box makes more sense once you compare it with the other page boxes people confuse with it. The names sound technical, but the practical difference is simple: each box answers a different question about the page.
| Page box | What it usually represents | Why you care |
|---|---|---|
| Media box | The full stored page area | Useful when you need to know the total canvas, including outer production space |
| Bleed box | Extra artwork beyond the finished page edge | Important when a design must print cleanly to the edge without white slivers |
| Trim box | The intended finished page after trimming | Helps you confirm where the real page should end for print, delivery, or review |
| Crop box | The visible page region many viewers show | Explains what people see on screen, which is not always identical to the finished page intent |
In a simple office document, these boxes often feel invisible because they more or less agree. In a design export or messy production PDF, they may not agree at all. That is when you need to know whether the file is wrong or whether it is simply carrying print-oriented structure that normal sharing no longer needs.
Easy mistake to avoid
People often treat the crop box as if it automatically defines the finished page. Sometimes it does. Sometimes it only defines what a viewer is showing while the real trim intent lives somewhere else.
Why checking the trim box matters
A trim-box check matters because it keeps you from solving the wrong problem. If the trim edge is correct, the PDF may only need visual cleanup. If the trim edge is wrong, a quick crop can hide the symptom without fixing the underlying output problem.
It tells you where the finished page is supposed to end
That makes it easier to distinguish a clean final page from a broader production canvas that still contains bleed, marks, or unused outer space.
It helps prevent clipped edge content
Page numbers, footers, signatures, and full-bleed design elements often sit closer to the finished edge than people expect.
It separates print-production files from reader-facing files
A PDF can be valid for press output and still look wrong for email, portal upload, or everyday screen reading.
It saves time during cleanup
Once you know where the finished page should end, you can crop, re-export, or leave the file alone with much more confidence.
Step-by-step: practical trim-box review workflow
1) Start with the exact outgoing file
Trim-box checks only help if you inspect the PDF that is actually leaving your workflow. If you check one export but send another, you may fix the wrong version and never solve the real handoff problem.
2) Identify the destination before the fix
Ask a basic question first: is this PDF going to a print vendor, a client, a portal, a teammate, or a normal archive? That answer changes what “correct” looks like. A production-facing PDF may intentionally keep more structure than a reader-facing one.
3) Compare the trim box with the visible page and outer area
Use View PDF Properties and your PDF workflow tools to confirm where the intended finished edge sits. Then compare that with what the viewer currently shows and what the full page canvas still contains. If the trim box and visible page disagree, you have useful evidence about whether the issue is page-box behavior or just sloppy export framing.
4) Check edge-sensitive content
Look carefully at page numbers, logos, captions, signatures, footers, thin rule lines, and artwork that runs to the edge. These are the elements most likely to reveal whether the current trim intent is safe or whether a small change will clip something important.
5) Decide whether the fix is crop or re-export
If the PDF simply exposes outer production space, Crop PDF is often enough. If the finished-page definition itself is wrong, or the design was exported with the wrong print settings, the better fix may be a corrected export from the source rather than more cleanup on the final PDF.
6) Test the result once
Reopen the file, print a proof, or preview it in the destination environment. The goal is not only to make one viewer look cleaner. The goal is to make the PDF behave like the finished document it claims to be.
Reliable sequence: confirm the destination, compare the trim box with the other page boxes, inspect edge content, then crop or re-export only for the real problem you found.
Common trim-box mistakes and what they usually mean
Most trim-box problems show up in a few repeat patterns. Recognizing the pattern helps you choose the right fix faster.
| What you see | What it often means | Best next check |
|---|---|---|
| Crop marks or outer bleed still visible | The visible page still includes production space beyond the intended finished edge | Compare trim box with crop box and review whether the file is reader-facing or production-facing |
| Edge text feels too close to the final page | The trim intent may be too aggressive, or the source artwork was built with poor safe margins | Inspect footers, signatures, and page numbers before cropping further |
| The file looks fine on screen but risky in print | The viewer may be masking page-box relationships that become obvious in output | Check trim, crop, and page size together instead of only trusting the preview |
| The document feels like a proof, not a final deliverable | The PDF may still carry prepress structure that no longer matches the destination | Confirm whether the file should be cleaned for normal sharing |
One subtle but important detail
A trim-box problem is not always solved by tighter cropping. Sometimes the file needs a better source export because the finished edge was defined badly from the start.
When to crop, re-export, or leave the PDF alone
Not every trim-box issue deserves the same response. The right answer depends on whether the problem lives in the visible outer area, the print-export settings, or the purpose of the document itself.
Crop when the finished page is right but the viewer is showing too much outer area
This is common in PDFs that still expose crop marks, bleed, or oversized outer borders even though the intended finished page is otherwise correct.
Re-export when the finished-page definition itself is wrong
If the trim edge was set badly in the source document, a quick crop may only hide the problem. Re-exporting is usually the cleaner fix when the design or print settings are fundamentally off.
Leave it alone when the file is intentionally production-ready
Some PDFs are supposed to preserve print-production structure. If the next step is commercial output and the vendor expects that structure, changing it too early may create a different problem instead of solving one.
Related LifetimePDF tools and guides
Trim-box checks usually sit inside a broader print-prep or cleanup workflow. These LifetimePDF pages pair naturally with this task:
Inspect the file and compare page-box behavior
- View PDF Properties to inspect file details before you change anything
- Check PDF Crop Box when the issue may be about what the viewer is showing
- Check PDF Page Size when you need to confirm the finished format too
Clean the PDF for final sharing
- Crop PDF Tool to remove outer production space when the finished page is already known
- Remove Crop Marks from PDF when visible marks are the real annoyance
- Crop PDF to Remove White Margins when the problem is more about empty space than print marks
Ready to make the file feel finished? Confirm the intended trim edge, remove outer clutter that does not belong, and send a PDF that behaves like the final document rather than a half-finished proof.
Best workflow for dependable results: identify the destination → confirm the trim edge → inspect edge content → clean only what does not belong → test once before delivery.
FAQ
1) How do I check a PDF trim box?
Check the PDF page boxes and compare the trim box with the crop box, media box, and any bleed area. The trim box shows where the finished page is meant to end after trimming.
2) What is the difference between a trim box and a crop box?
The trim box represents the intended finished page edge. The crop box represents the visible page area many viewers display. They may match, but they do not always serve the same purpose.
3) Why should I check the trim box before printing or sharing?
It helps you confirm whether the PDF is behaving like a finished document or still carrying production-oriented outer space. That reduces the risk of visible marks, clipped edge content, or confusing page boundaries.
4) Does changing the trim box delete PDF content?
Not necessarily. In many workflows, it changes what is treated as the finished area rather than permanently removing every bit of content outside that boundary. That is why previewing the result still matters.
5) Should I leave the trim settings alone in a production-ready PDF?
Usually yes if the next step is commercial print and the production file is intentional. For normal sharing, review, or upload workflows, the better result is often a cleaner reader-facing copy.
Published by LifetimePDF — Pay once. Use forever.